
티스토리 뷰
GDI+ 기본 : https://petra.tistory.com/1729
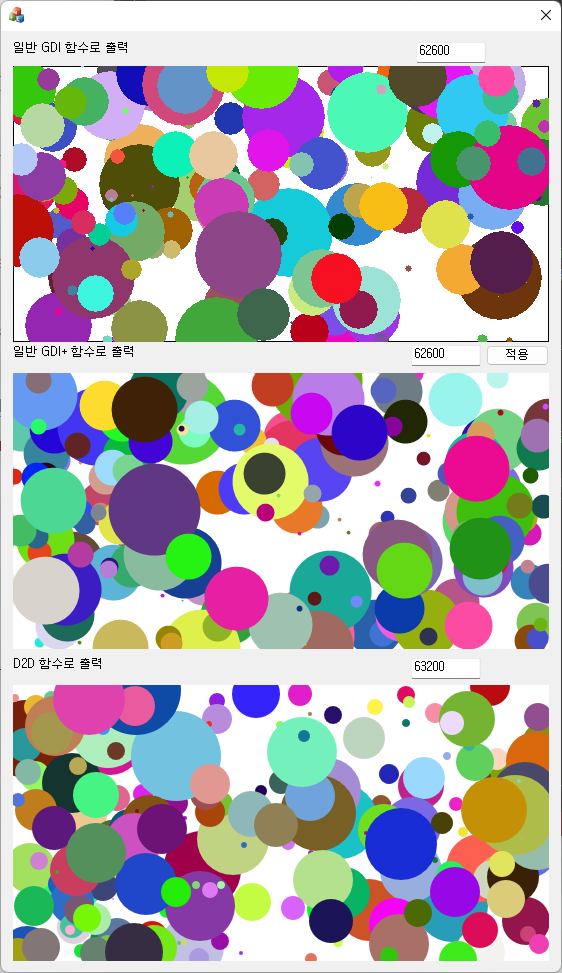
GDI, GDI+ 는 더블버퍼링 적용했을때 이 코드에서는 속도차이를 모르겠고
다만, 원의 갯수를 200 에서 2000 으로 늘려서 해보니 Direct2D는 GDI, GDI+ 보다 CPU사용률이 적다.
1. DGI와 GDI plus 에서 화면 DC에 직접 그리므로 깜박임이 발생한다.
DGI 보다 GDI+ 가 빠르게 그려준다.
2. GDI plus 에서 Bitmap 메모리에 그린 다음 화면 DC에 Bitmap 을 직접 그리므로 깜박임이 없다.
|
1
2
3
4
5
6
7
8
9
10
11
12
13
14
15
16
17
18
19
20
21
22
23
24
25
26
27
28
29
30
31
32
33
34
35
36
37
38
39
40
41
42
43
44
45
46
47
48
49
50
51
52
53
54
55
56
57
58
59
60
61
62
63
64
65
66
67
68
69
70
71
72
73
74
75
76
77
78
79
80
81
82
83
84
85
86
87
88
89
90
91
92
93
94
|
int CGDI_Plus_View::OnCreate(LPCREATESTRUCT lpCreateStruct)
{
if (CWnd::OnCreate(lpCreateStruct) == -1)
return -1;
// TODO: 여기에 특수화된 작성 코드를 추가합니다.
GdiplusStartupInput gpsi;
if (GdiplusStartup(&m_token, &gpsi, NULL) != Ok) return 0;
GetClientRect(m_rect);
int w = m_rect.Width(), h = m_rect.Height();
srand((unsigned int)time(NULL));
mp_mem_image = new Bitmap(w, h);
mp_mem_graphics = new Graphics(mp_mem_image);
mp_brush = new SolidBrush(Color(255, 255, 255, 255));
mp_mem_graphics->SetSmoothingMode(SmoothingModeAntiAlias);
CircleDataPlus* p = m_list;
for (int i = 0; i < MAX_GDI_PLUS_COUNT; i++, p++)
{
p->x = rand() % w;
p->y = rand() % h;
p->radius = rand() % 40 + 10;
p->a = 255;
p->r = rand() % 256;
p->g = rand() % 256;
p->b = rand() % 256;
}
SetTimer(1, 10, NULL);
return 0;
}
void CGDI_Plus_View::ImageDarw(CDC* ap_dc)
{
Graphics* p_graphics = new Graphics(ap_dc->m_hDC);
mp_brush->SetColor(Color(255, 255, 255, 255));
mp_mem_graphics->FillRectangle(mp_brush, m_rect.left, m_rect.top, m_rect.right, m_rect.bottom); // Bitmap 메모리에 그린다
CircleDataPlus* p = m_list;
for (int i = 0; i < MAX_GDI_PLUS_COUNT; i++, p++)
{
mp_brush->SetColor(Color(p->a, p->r, p->g, p->b));
mp_mem_graphics->FillEllipse(mp_brush, p->x - p->radius, p->y - p->radius, p->radius << 1, p->radius << 1); // Bitmap 메모리에 그림
}
p_graphics->DrawImage(mp_mem_image, 0, 0); // 이미지를 화면에 그림
delete p_graphics;
}
void CGDI_Plus_View::NormalDraw(CDC* ap_dc)
{
Graphics* p_graphics = new Graphics(ap_dc->m_hDC);
p_graphics->SetSmoothingMode(SmoothingModeAntiAlias);
mp_brush->SetColor(Color(255, 255, 255, 255));
p_graphics->FillRectangle(mp_brush, m_rect.left, m_rect.top, m_rect.right, m_rect.bottom); // 화면에 직접 그려 깜박임
CircleDataPlus* p = m_list;
for (int i = 0; i < MAX_GDI_PLUS_COUNT; i++, p++)
{
mp_brush->SetColor(Color(p->a, p->r, p->g, p->b));
p_graphics->FillEllipse(mp_brush, p->x - p->radius, p->y - p->radius, p->radius << 1, p->radius << 1); // 화면에 직접 그려 깜박임
}
delete p_graphics;
}
void CGDI_Plus_View::OnPaint()
{
CPaintDC dc(this); // device context for painting
// TODO: 여기에 메시지 처리기 코드를 추가합니다.
// 그리기 메시지에 대해서는 CWnd::OnPaint()을(를) 호출하지 마십시오.
//NormalDraw(&dc); // DC에 직접 그려 깜박임 발생한다.
ImageDarw(&dc); // Bitmap 에 그린 후 Bitmap 을 화면에 보여주고 있어 깜박임이 없다.
}
void CGDI_Plus_View::OnTimer(UINT_PTR nIDEvent)
{
// TODO: 여기에 메시지 처리기 코드를 추가 및/또는 기본값을 호출합니다.
if (1 == nIDEvent)
{
int w = m_rect.Width(), h = m_rect.Height();
CircleDataPlus* p = m_list;
for (int i = 0; i < MAX_GDI_PLUS_COUNT; i++, p++)
{
p->radius--;
if (p->radius == 0)
{
p->x = rand() % w;
p->y = rand() % h;
p->radius = rand() % 40 + 10;
p->r = rand() % 256;
p->g = rand() % 256;
p->b = rand() % 256;
}
}
Invalidate(0);
} else
CWnd::OnTimer(nIDEvent);
}
|
cs |
3. Direct2D 는 COM 객체를 이용하여 GPU에서 화면을 그리므로 속도가 빠르다.
|
1
2
3
4
5
6
7
8
9
10
11
12
13
14
15
16
17
18
19
20
21
22
23
24
25
26
27
28
29
30
31
32
33
34
35
36
37
38
39
40
41
42
43
44
45
46
47
48
49
50
51
52
53
54
55
56
57
58
59
60
61
62
63
64
65
66
67
68
|
using namespace D2D1;
#pragma comment(lib, "D2D1.lib") // Direct2D
int CD2D_View::OnCreate(LPCREATESTRUCT lpCreateStruct)
{
...
// TODO: 여기에 특수화된 작성 코드를 추가합니다.
CoInitializeEx(NULL, COINIT_APARTMENTTHREADED); // COM 초기화
D2D1CreateFactory(D2D1_FACTORY_TYPE_SINGLE_THREADED, &mp_factory); // COM 인터페이스 주소를 얻는다.
CRect r;
::GetClientRect(m_hWnd, &r);
m_rect = r;
ID2D1HwndRenderTarget* p_hwnd_target; // Direct2D에서 윈도우의 클라이언트 영역에 그림을 그리는 객체
// 지정한 윈도우의 클라이언트 영역에 그림을 그리기 위한 랜더 타겟을 생성한다.
mp_factory->CreateHwndRenderTarget(RenderTargetProperties(),
HwndRenderTargetProperties(m_hWnd, SizeU(r.right - r.left, r.bottom - r.top)), &p_hwnd_target);
...
}
void CD2D_View::OnPaint()
{
CPaintDC dc(this); // device context for painting
// TODO: 여기에 메시지 처리기 코드를 추가합니다.
// 그리기 메시지에 대해서는 CDialogEx::OnPaint()을(를) 호출하지 마십시오.
::ValidateRect(m_hWnd, NULL); // WM_PAINT 플래그를 무효화 한다.
Draw();
}
void CD2D_View::Draw()
{
mp_target->BeginDraw();
mp_target->Clear(ColorF(1.0f, 1.0f, 1.0f));
CircleDataD2D* p = m_list;
//D2D1_ELLIPSE pos;
if (NULL != mp_brush)
{
for (int i = 0; i < MAX_D2D_COUNT; i++, p++)
{
//mp_brush->SetColor(D2D1_COLOR_F({ m_list[i].a, m_list[i].r, m_list[i].g, m_list[i].b })); // 반투명게 나온다.
mp_brush->SetColor(ColorF(m_list[i].r, m_list[i].g, m_list[i].b)); // 브러시 색상을 바꾸고 불투명하게 나온다.
//pos = D2D1_ELLIPSE({ { m_list[i].x, m_list[i].y }, m_list[i].radius, m_list[i].radius });
//mp_target->FillEllipse(pos, mp_brush);
mp_target->FillEllipse(D2D1_ELLIPSE({ { m_list[i].x, m_list[i].y }, m_list[i].radius, m_list[i].radius }), mp_brush);
m_cnt++;
}
}
mp_target->EndDraw(); // 그리기 작업을 종료하고 화면에 출력한다.
}
void CGDI_Plus_View::OnDestroy()
{
...
// TODO: 여기에 메시지 처리기 코드를 추가합니다.
KillTimer(1); KillTimer(2);
delete mp_mem_graphics;
delete mp_mem_image;
delete mp_brush;
GdiplusShutdown(m_token);
}
|
cs |
1. #pragma comment(lib, "D2D1.lib") 필요하다.
lib 없으면 링크 에러 난다.
2. Direct2D를 구성하는 각종 객체를 생성하는 Factory객체
ID2D1Factory* mp_factory;
3. Direct2D에서 윈도우의 클라이언트 영역에 그리을 그릴 객체
ID2D1RenderTarget* mp_target;
4. COM을 사용하기 위해 초기화 함수 호출
CoInitializeEx(NULL, COINIT_APARTMENTTHREADED);
5. D2D를 사용하기 위한 팩토리를 생선한다.
D2D1CreateFactory(D2D1_FACTORY_TYPE_SINGLE_THREADED, &mp_factory);
6. 윈도우 기반 렌터 타겟을 생성해서 주소를 가져올 포인터 선언
ID2D1HwndRenderTarget* p_hwnd_target;
7. 지정한 윈도우의 클라이언트 영역에 그림을 그리기 위한 Render Target을 생성한다.
RECT r;
GetClientRect(&r);
mp_factory->CreateHwndRenderTarget(D2D1::RenderTargetProperties(), D2D1::HwndRenderTargetProperties(m_hWnd, D2D1::SizeU(r.right - r.left, r.bottom - r.top)), &p_hwnd_target);
8. 부모 인터페이스로 주소를 저장한다.
mp_target = p_hwnd_target;
9. 사용하던 D2D 객체를 해제한다.
IRelease(&mp_target);
IRelease(&mp_factory);
CoUninitialize();
10. WM_PAINT 처리기인 OnPaint() 에서 그리기
void CDataListWnd::OnPaint()
{
CPaintDC dc(this); // device context for painting
::ValidateRect(m_hWnd, NULL); // // WM_PAINT 플래그를 무효화한다.
mp_target->BeginDraw();
mp_target->Clear(D2D1::ColorF(0.0f, 0.0f, 0.0f)); // 바탕색을 검정색으로 지정
mp_target->EndDraw(); // 그리기 작업을 종료하고 화면에 출력한다.
}
그러면 클라이언트 영역의 배경색을 검정색으로 그린다.